QP-Platform
Unity project for QP-Platform, used for building and exporting Android, iOS, and Web builds.
Prerequisites
-
Unity 6000.0.30f1
- Must be installed at:
/Applications/Unity/Hub/Editor/6000.0.30f1/Unity.app
- Must be installed at:
-
OpenJDK 17
-
Gradle
-
Android SDK
-
Xcode (for iOS builds)
Project Structure
QP-Platform/
├── Platform/                 # Unity project directory
│   ├── Assets/              # Unity assets
│   └── Build/               # Output directory for final builds
├── logs/                    # Build logs directory
├── scripts/
│   └── buildTargets/
│       ├── build_targets.sh           # Main build entry script
│       ├── build_aar.sh               # Android AAR build script
│       ├── build_ios_framework.sh     # iOS Framework build script
│       └── build_web.sh               # WebGL build script
└── ...
Building (Android, iOS, Web)
-
Make the main build script executable:
chmod +x scripts/buildTargets/build_targets.sh -
Run the build script from the project root:
# To build all targets: ./scripts/buildTargets/build_targets.sh # To build only Android: ./scripts/buildTargets/build_targets.sh android # To build Android and iOS: ./scripts/buildTargets/build_targets.sh android ios -
The script will:
-
Export Unity project for the selected targets
-
Build AAR (Android), Framework (iOS), or WebGL (Web)
-
Copy final artifacts to the appropriate build folders
-
Build Artifacts
-
Android AAR:
Platform/Build/unityLibrary-release.aar -
iOS Framework:
Platform/Exports/iOS/build/Release-iphoneos/UnityFramework.framework -
WebGL Zip:
Platform/Build/Web/qp-platform-web.zip -
Build Logs:
logs/
Troubleshooting
If build fails, check:
-
Unity installation path is correct
-
Java version is OpenJDK 17
-
Gradle is installed and in PATH
-
Android SDK is properly set up
-
Xcode is installed and selected (for iOS)
-
logs/for build logs -
File permissions (scripts need execute permission)
Notes
-
All scripts use relative paths from the project root
-
Always run build scripts from the project root directory
-
Exits immediately on any error (set -e)
-
Creates necessary directories automatically
-
Verifies artifact creation and copy operations
Building Quick-Play Games
Quick-Play Submission Guidelines
A Quick-Play game should be submitted as an addressable asset bundle along with game code compiled into DLL, the addressable asset bundle must contain the game prefab.
The game prefab would act as the entry point for the game on the Nostra Quick-Play platform, it should contain the GamesController component which is responsible for establishing an interface between the game and the QP Platform. GamesController is defined in the nostra-qp-sdk which is already included in this platform repository.
1. Quick-Play Game Constraints
There are some constraints that needs to followed while building a Quick-Play game, which are as follows:
-
The game must be a single scene game, which means the game should not have multiple scenes.
-
The game must use only the set of Tags and Layers defined in the platform.
-
Do not include any new third party packages or plugins into the project, use the ones already included in the platform, if any new packages are required contact the platform Dev team.
-
Do not use Unity PlayerPrefs, instead use PlayerPrefs system provided by the nostra-qp-sdk
   public class MyGameController : GamesController
   {
         void SavePlayerDatat()
         {
            GetPlayerPrefsManager().SetInt("PlayerScore", 100);
         }
   }
-
Do not change Time.timeScale as that can cause the platform to freeze or behave unexpectedly.
-
Game must use Unity's new input system, and should not use the legacy input system.
-
Each game class must have a name space that follows the Format:
nostra.studioName.gameName -
Game code should not use functions like
FindObjectByNameas it can give unexpected results in the quick-play environment, with multiple games loaded at the same time. -
Game should use Universal Render Pipeline (URP) for rendering.
2. Quick-Play Game Feature Expectations
-
Game should have an auto-play (preview) mode where the game plays itself without user input, to be used for the game card preview.
-
Game should enter play mode when the user clicks play button on play card without any intermediate screen.
-
There should be a watch (Record/Replay) using Chrono Stream recording framework.
3. General Coding Guidelines
-
Avoid frequent instantiation of game objects, use object pooling where possible.
-
Do not use
DontDestroyOnLoadas it can cause issues with the platform's scene management.
Nostra Quick-Play SDK Integration
1. Interfacing with Quick-Play Platform, Via GamesController
The "game" prefab must have a component attached to it that need to derive from GamesController, which is the entry point for the game on the Nostra Quick-Play platform.
You must override the OnCardStateChanged method in your GamesController class to handle the game state changes. The CardState enum defines the various states that a game can be in, such as CardState.PLAY, CardState.PAUSE, CardState.STOP, etc.
    protected override void OnCardStateChanged(CardState _cardState)
        {
            switch (_cardState)
            {
                case CardState.LOADED:
                    gameManager.OnLoaded();
                    break;
                case CardState.FOCUSED:
                    gameCanvas.SetActive(false);
                    gameManager.OnFocussed();
                    break;
                case CardState.START:
                    gameCanvas.SetActive(true);
                    gameManager.OnStart();
                    gameRecorder.StartRecording();
                    break;
                case CardState.PAUSE:
                    gameCanvas.SetActive(false);
                    gameManager.OnPause();
                    break;
                case CardState.RESTART:
                    gameCanvas.SetActive(true);
                    gameManager.onRestart();
                    break;
                case CardState.REDIRECT:
                    gameCanvas.SetActive(true);
                    gameManager.OnStart();
                    break;
                case CardState.GAMEOVER_WATCH:
                    break;
            }
        }
2. Using "Nostra Characters" in Quick-Play Games
GamseController let's you request any amount of Nostra Character from platform to be used in your game
public void GetCharacters()
{
      // Request 5 Nostra Characters from the platform
      NostraCharacter[] characters = GetGameCharacters(5);

      //Apply player customisation to character
      PlayerCharacterCustomise(charactes[0]); //Important: must apply player customisation to player character
      NostraCharacter player = characters[0];

      //Apply random character to bots/NPCs
      for (int i = 1; i < characters.Length; i++)
      {
         NostraCharacter bot = characters[i];
         PlayerRandomCustomisation(bot);
      }
}
Functions likeGetGameCharacters,PlayerCharacterCustomise and PlayerRandomCustomisation are defined in the GamesController base class in nostra-sdk, which you can use to request characters and apply customisation.
Once you have received the characters from the platform, you can replace the default RuntimeAnimationController used by the nostra character with your own, given that your animation controller is compatible with the nostra character's character rig.
[SerializeField] private RuntimeAnimatorController playerAnimationController; // Your custom animator controller
[SerializeField] private RuntimeAnimatorController botAnimationController; // Your custom animator controller for bots

public void GetCharacters()
{
      // Request 5 Nostra Characters from the platform
      NostraCharacter[] characters = GetGameCharacters(5);

      //Apply player customisation to character
      PlayerCharacterCustomise(charactes[0]); //Important: must apply player customisation to player character
      NostraCharacter player = characters[0];

      player.SetAnimatorController(playerAnimationController); // Set your custom animator controller

      //Apply random character to bots/NPCs
      for (int i = 1; i < characters.Length; i++)
      {
         NostraCharacter bot = characters[i];
         PlayerRandomCustomisation(bot);
         bot.SetAnimatorController(botAnimationController); // Set your custom animator controller for bots
      }
}
3. Using PlayerPrefs in Quick-Play Games
Quick-Play games should use the PlayerPrefsManager provided by the GamesController to store and retrieve player preferences. This ensures that player data is correctly synced with the platform.
public class MyGameController : GamesController
{
    void SavePlayerData()
    {
        // Save player score
        GetPlayerPrefsManager().SetInt("PlayerScore", 100);

        // Save player name
        GetPlayerPrefsManager().SetString("PlayerName", "Player1");
    }

    void LoadPlayerData()
    {
        // Load player score
        int score = GetPlayerPrefsManager().GetInt("PlayerScore", 0);

        // Load player name
        string name = GetPlayerPrefsManager().GetString("PlayerName", "Guest");
    }
}
💡 Note:Do not use Unity's
PlayerPrefsdirectly, as it may not work correctly in the Quick-Play environment. Always use theGetPlayerPrefsManager()method provided by theGamesControllerto access player preferences.
Testing Game in Quick-Play Environment
Once you have your game prefab ready with the GamesController component, you can test your game in the Quick-Play environment by following these steps:
-
Make your game prefab an addressable asset: Ensure your game prefab is marked as an addressable asset in Unity. This allows the
Quick-Playplatform to load your game dynamically.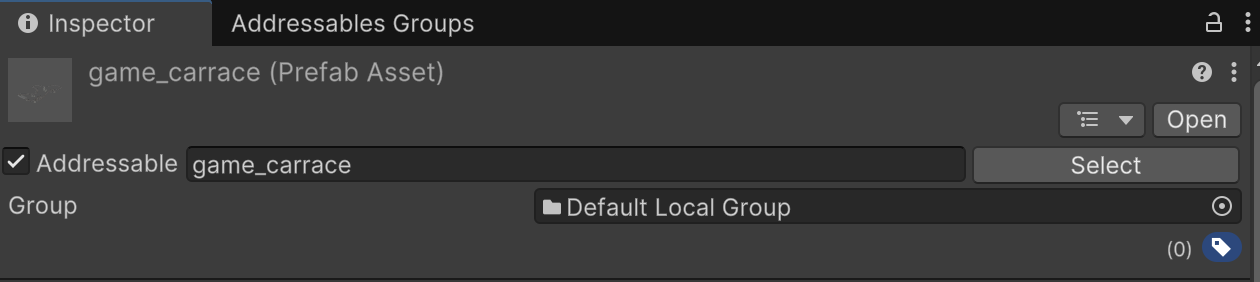
-
Open QuickPlay Scene: Open the QuickPlayController scene in the Unity editor.
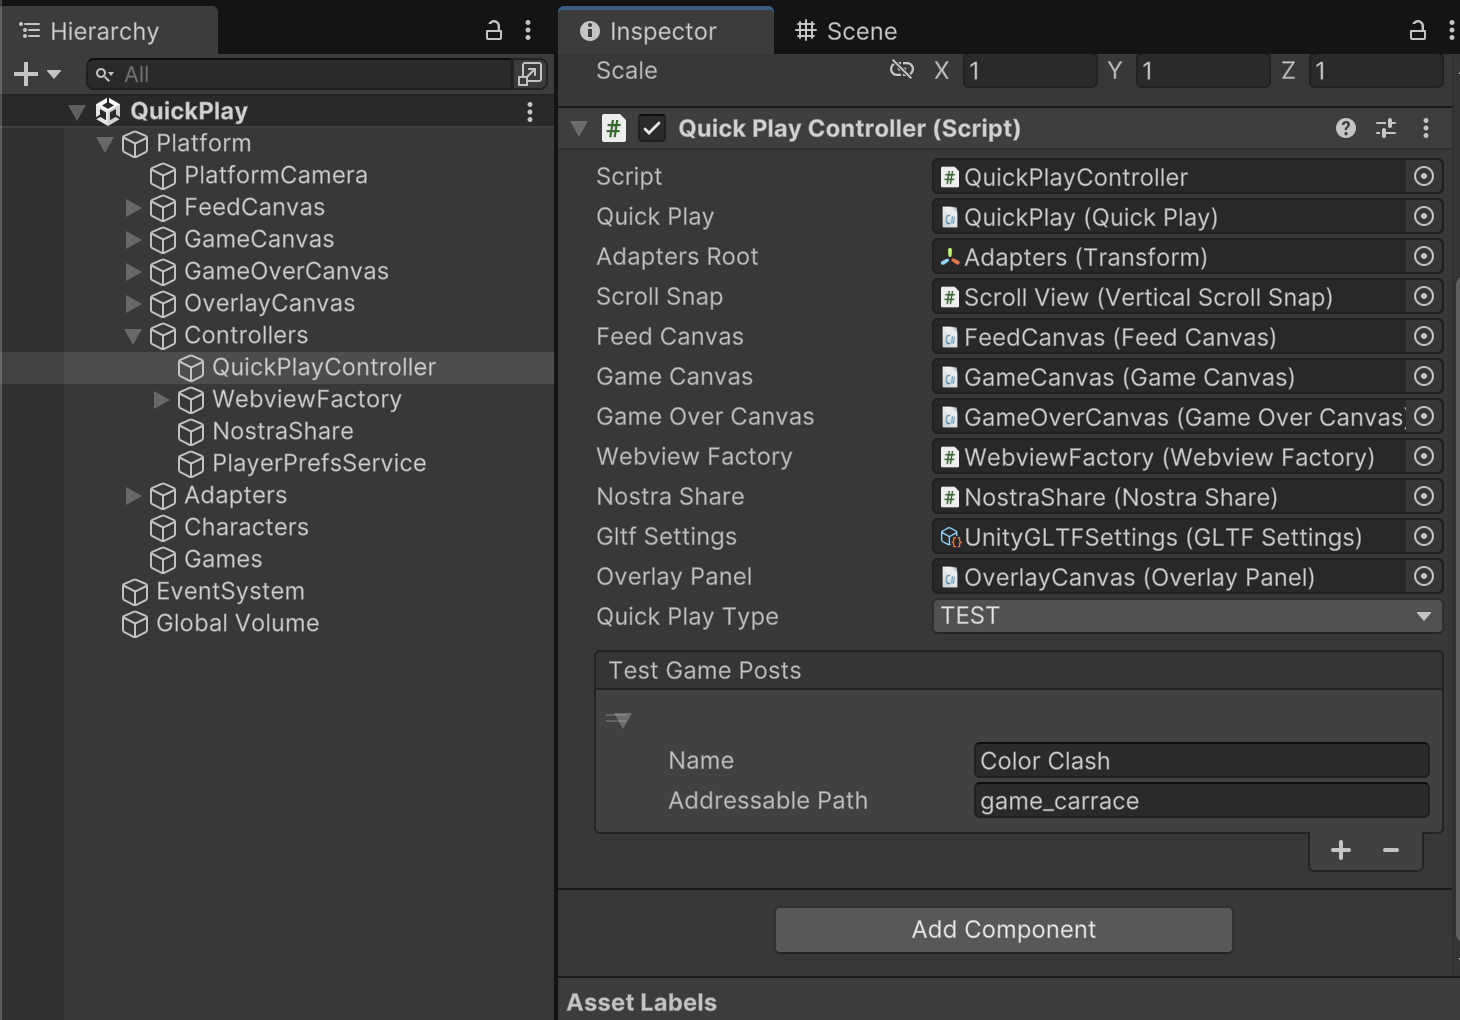
-
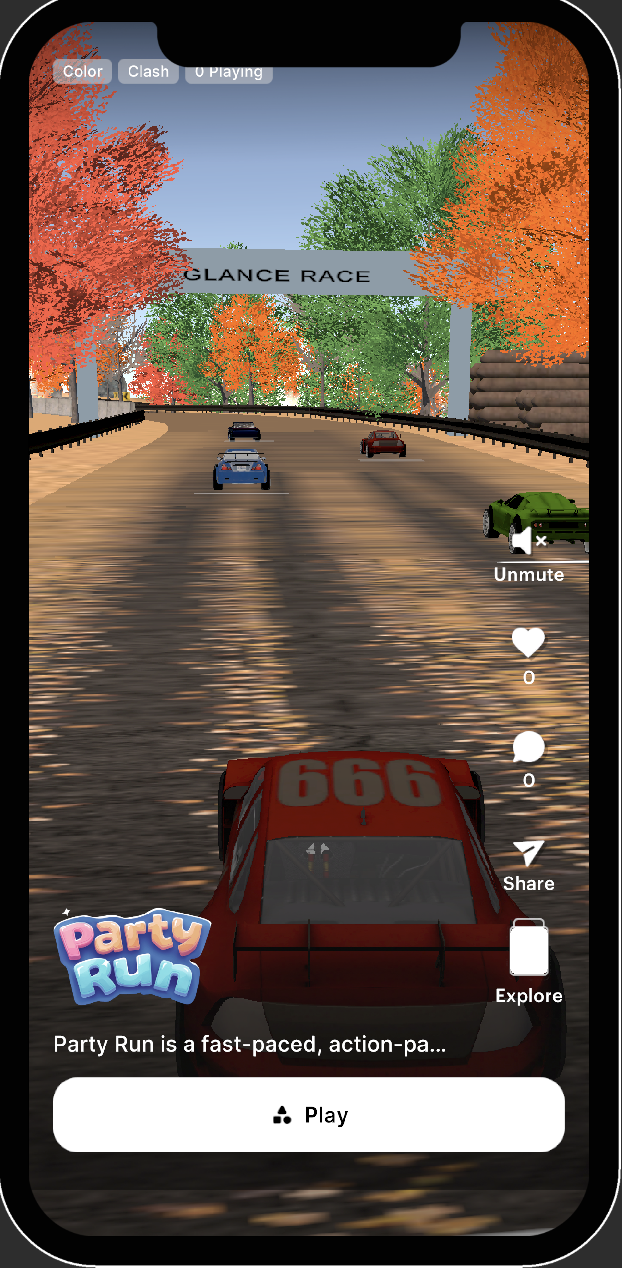
Add an entry in TestPosts in QuickPlayController: Add a new entry with the game name and addressable path
-
Run the scene: Press play in the Unity editor to start the Quick-Play platform. Your game should appear as first post in the Quick-Play feed.